.png?width=250&height=34&name=BS-logo-pb%20(1).png)
1. Create a New Release
Setup > Releases
1. Click the blue + icon
2. Select the Brand
Enter the following details checking all required fields are complete:
• Release Name
• Delivery Months
• Currency
• Start Date
• End Date
• Release will be in a Draft mode.
Save the Release once complete.
2. Validate the DLS (Data Load Sheet)
Before uploading products, the DLS file must be validated.
Navigate to:
Administration > Product DLS Import
1. Select the Brand
2. Select the Release
3. Upload your completed DLS file, providing to you during onboarding
4. Click Validate
If the file is valid:
• A notification will appear confirming the file is valid and ready to upload.
If the file contains errors:
• A copy of the DLS will automatically download to your computer.
• The file will include an additional “Status” column outlining the validation errors and directing you to the fields that require correction.
To understand DLS definitions, use our guide: Complete a Data Load Sheet
3. Upload the DLS File
Once validated, repeat the steps above, selecting Upload instead of Validate. This uploads the products to the Release.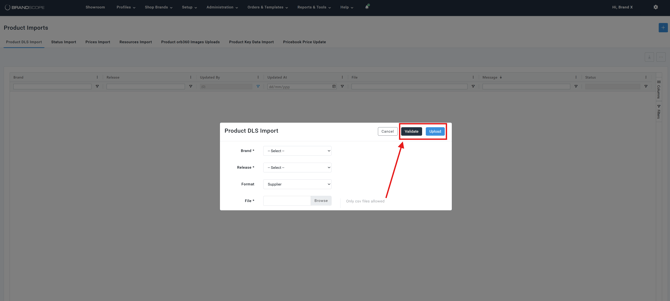
4. Review the Release in Draft Mode
While in Draft:
-
Check for missing product information, incorrect pricing, duplicates, and variant errors.
-
The Release can still be deleted at this stage by a brandscope admin if required.
5. Generate a Test Order CSV
To test the Release:
Navigate to: Release Admin → Releases
-
Click the Shopping Cart icon next to the Release.
-
Select the appropriate order settings (e.g. date range, currency, and order type).
-
Click Generate.
Alternatively, use your Test Retailer and create a test order to sync to your ERP system. If unsure about settings, contact your Brandscope Account Manager.
6. Add Product Images
Add product images for a complete visual presentation.
-
Guide: Bulk Upload Product Images
-
Recommended size: 720 x 900 px
7. Add a Release Banner
Add a banner to represent the Release visually.
Navigate to: Release Admin → Releases → Edit
-
Scroll to the bottom and upload the Banner Image.
-
Recommended size: 994 x 150–250 px
8. Update the Homepage
Ensure the homepage reflects and promotes the new Release. Update any featured banners or spotlight sections to highlight the Release to visiting retailers.
⚠️ A detailed guide for this step is coming soon. In the meantime, contact your Brandscope Account Manager for assistance.
9. Add Marketing Assets (Optional)
Support the Release with additional materials:
-
Videos
-
PDFs
-
Landscape marketing images
-
Recommended image size: 990 x 675 px
10. Change Release Status
After review, update the Release status to the appropriate mode.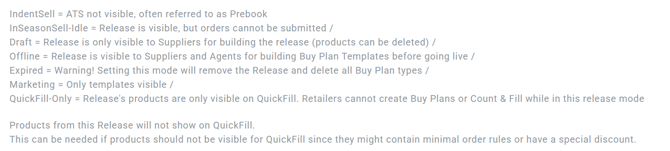
11. Assign Retailers
Ensure retailers are assigned to the Release for access and ordering.
12. EDM Promotion (Optional)
Promote the Release via email marketing.
-
Each Release is allocated up to two EDMs (Electronic Direct Mail campaigns) for retailer promotion.
-
Contact your Brandscope Account Manager to schedule this.